How to set up SMS with Zendesk and ClickSend
This guide will walk you through the process of setting up and using ClickSend within your Zendesk environment. You’ll be able to manage your SMS communications, all from one tool.
Installation
Visit the ClickSend SMS App Page in the Zendesk Marketplace.
On the right side, click the Install button.
Choose the Zendesk account you want to install the app on.
Click Install again to finish and confirm installation.
How to connect ClickSend to Zendesk
To connect to ClickSend, you’ll need to authenticate and set up your ClickSend account within Zendesk. Follow the steps below:
- Log in to Zendesk Admin and navigate to your Zendesk admin panel.
- Navigate to Integrations. Then, find and select the ClickSend SMS integration option.
- Enter your Username and ClickSend API key. They can be found here
- Click Connect to ClickSend and test the connection to ensure everything is working correctly.
- To verify the app is installed, look for the ClickSend gradient icon on the left-hand panel. You can also confirm in the Admin Center by selecting the drop-down menu at the top right of the page and going to Apps and Integrations > Zendesk Support Apps > Currently Installed.

Authentication:
Once the Zendesk app is installed, you can log in by selecting the ClickSend logo in the lower left of the panel in the page. Here, you can enter your ClickSend username and API Key and hit Connect to ClickSend.

Once successfully logged in, your history will be populated.
You can now send and receive SMS through Zendesk.
Sending SMS from Zendesk
There are three ways to send SMS messages from Zendesk:
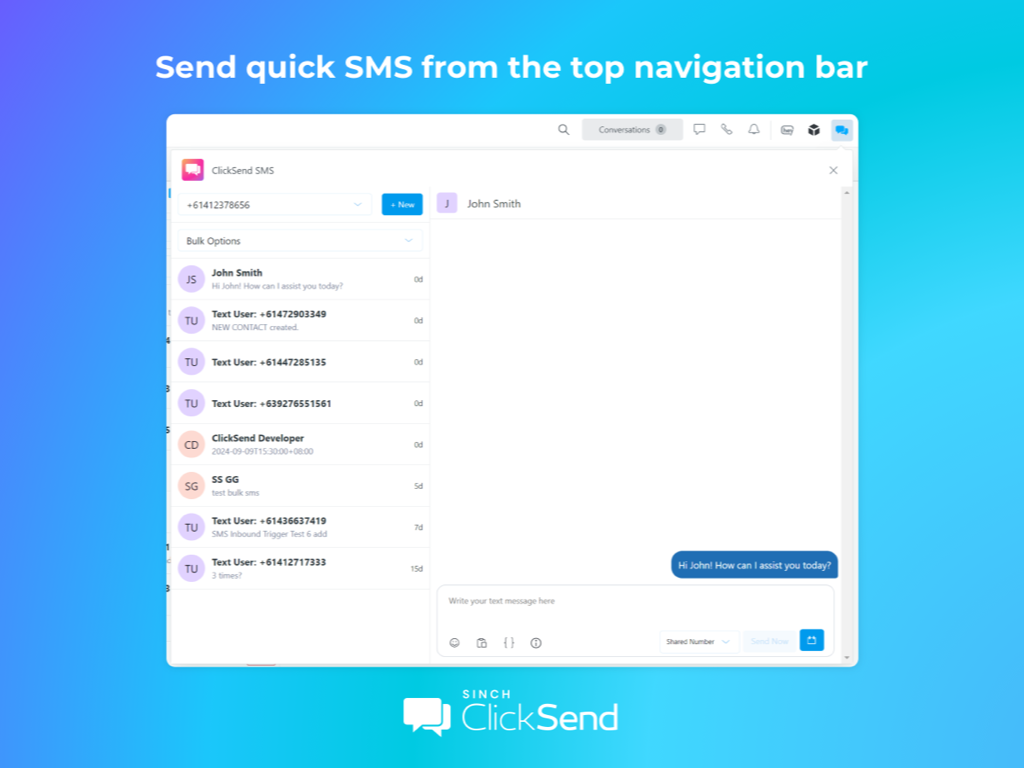
- Send via Top Bar (Recommended for Quick SMS)
The top bar is accessible from any page within Zendesk. It allows you to quickly send personalised messages to your Zendesk contacts and track each message.
Ideal for: quick, on-the-go communications.
- Send via Side Bar
Side Bar is accessible from the ticket page. It enables you to send messages directly when you have an open ticket. Ensure the contact in the chat has a phone number saved.
Ideal for: communication and customer service chats about specific tickets.

- Send via the Navigation Bar
It is located in the main navigation bar of Zendesk. You can send both individual and bulk SMS from the navigation bar.. Bulk SMS can be sent by selecting a group or organisation.
Ideal for: mass communication and bulk messaging needs.


Replies/Inbound SMS
You can receive SMS replies to Zendesk. Here’s how it works:
How to check unread messages
Zendesk shows a red dot next to any unread inbound messages. You need to monitor your dashboard actively, as it may not function if your ClickSend account has more than 10 inbound rules. All replies will appear in real-time on your Zendesk dashboard.
Monitoring tips
Regularly review your messages to ensure prompt responses to inbound SMS.
FAQs
Q: How do I set up ClickSend integration in Zendesk?
A: Follow the authentication steps outlined in the Authentication section above.
Q: Can I track the status of my sent SMS messages?
A: Yes, you can track each message sent via the Top Bar, Side Bar, and Navigation Bar.
Q: What should I do if I encounter issues with inbound SMS?
A: Refer to the Troubleshooting section for guidance. If problems persist, contact ClickSend support for further assistance.
Q: How can I send bulk SMS messages?
A: Use the navigation bar option for bulk SMS. Select a group or organisation to send messages to multiple recipients.
Q: Can I receive inbound messages worldwide?
A: Inbound message reception depends on your location. Not all countries support inbound messages. Check the list of countries that allow two-way messaging here.
Q: Can I use shared numbers for receiving inbound SMS?
A. Shared numbers are used by multiple ClickSend users and may not offer reliable service. For optimal performance, use a dedicated number. Purchase a dedicated number here.
Troubleshooting
If you encounter issues, please check the following:
- Authentication issues
- Ensure you are using your ClickSend username and API key for authentication, not your ClickSend password.
- Inbound SMS reception
- Verify that you have a dedicated number configured to receive inbound messages. Shared numbers may not support inbound SMS. Purchase a dedicated number via the ClickSend Dashboard.
- Account Credit
- Confirm that you have sufficient credit in your ClickSend account for sending SMS. Check your account balance and top up here.
- Phone number formatting
- Ensure that all local phone numbers are converted to the international format (e.g., +1 for the US).
- Send SMS configuration
- Make sure all required fields are filled in the Send SMS action configuration. Essential values include the recipient number and the message content.
- Global Sending settings
- Enable global sending for the country you are targeting. For assistance, please reach out to ClickSend support or consult more info here.
- Alpha tag as a Sender ID
If using an alpha tag as a Sender ID and it’s not functioning correctly, verify the following:
- The alpha tag must not exceed 11 characters, including spaces.
- Confirm that the destination country supports alpha tags.
- Inbound SMS is not showing up?
- Your ClickSend account might have more than 10 webhooks existing on the message settings. The Zendesk integration uses webhook to receive inbound SMS. For more information visit - How do Inbound Rules work? – Incoming/Reply SMS options
If these steps do not resolve your issue, please contact ClickSend support for further assistance.