Autopilot
There are 2 ways to integrate with Autopilot. A webook integration and a Zapier integration.
Option 1: Webhook Autopilot Integration
This integration is perfect for triggering outbound SMS in an autopilot journey.
- Create a new Autopilot journey
- Add a List Trigger and choose a list. In this case, when a new contact is added to a list, it will trigger a SMS to be sent.

- Add a Webhook action with the following properties:
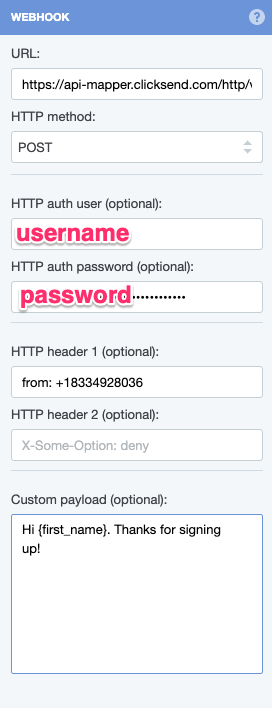
Where:
- URL: https://api-mapper.clicksend.com/http/v2/autopilot
- HTTP Method: POST
- HTTP auth user: your ClickSend username
- HTTP auth password: ClickSend password
- HTTP header 1: This is optional and can be used to set the from number. If you want to set the from number, it must be in the format shown in the screenshot e.g. "from: xxxxx" where xxxxx is your ClickSend phone number.
- Custom payload: This is the message body you want to send. This supports placeholders on any field, for example if you want to use the contacts First Name in the message, the placeholder will be {first_name}. e.g. "Hi {first_name}, this is a test message.". The placeholder should be the autopilot field name converted to lower case, with underscores instead of spaces.
- Publish the journey
- Add a contact to test the journey. When a contact is added to the list chosen in the trigger, a SMS will be sent to them. The contact will need the 'Work Phone' or 'Mobile Phone' field populated with their mobile number.
Option 2: Zapier Autopilot Integration
This integration supports all products and allows more triggers and actions.
Prerequisite
You need a Zapier account first. If you don't have an account, click here to create a Zapier account.
Introduction
In this article, we will try integrating both ClickSend and Autopilot. So what we want to achieve here is to add a new contact in ClickSend when a contact is added in Autopilot, allowing the user to use ClickSend to communicate with those contacts.
So, let's get started.
- Login to your Zapier account. And then click Make a Zap! button.
- Let's search and select Autopilot as our trigger app. Next, check Contact Added as our trigger action. Then click Save + Continue button.
- Let's link your Autopilot account.
Select Choose Account.
Click Connect an Account button.
Enter your Autopilot Key.
Then click Save + Continue button.
- Let finish up our trigger app setup.
Go back to your Zapier setup page.
Then click Fetch & Continue button.
Lastly the Continue button.
- Ok, let's set up our Action app. Let's search and choose ClickSend.
Next select Create Contact as our action.
Then click Save + Continue button.
- Next, let's add your ClickSend account. Click Connect an Account button.
There should be a popup saying to add or allow your Zapier and ClickSend account to be linked together.
Type in your ClickSend username and API key.
Click the Test button to check if it was successful.
Then click Save + Continue button.
- Let's set up our new contact.
In the Contact List input box, select the contact list that you want the new contacts to be added to (Autopilot contacts etc...)
Set First Name, Last Name, Email, Phone, Company, Etc to their corresponding fields from Autopilot.
Then click Continue button.
- Let's finish up everything.
Click Create & Continue button.
Then the Finish button.
Lastly, name your Zap, and turn it ON